Introduction
I caught A–flu one weekend and was too tired to think about anything serious. Between fever spikes and boredom, I noticed a couple of VNPT MyTV Smartbox 2 units (Amlogic S805) that had been sitting untouched for years. They originally ran Android 4.4 — far too outdated to be useful now — but still perfectly functional pieces of hardware.
I cracked one open. The inside was far better than expected for a low-cost IPTV box: clean PCB layout, solid soldering, proper shielding, stable power rails, and easy UART pads placed exactly where you want them. Once connected, the board showed a short one-second U-Boot window. If I didn’t interrupt it in time, it would simply continue into Android and drop me directly into a root shell — unexpectedly convenient.
From there, the idea was simple: turn these obsolete Android boxes into small Debian/Armbian machines. Nothing serious — just a side quest while recovering.
This article is not a step-by-step guide. It is simply a record of what I tried, what worked, and what didn’t during the process of making Debian boot on this hardware.
The Easy Part
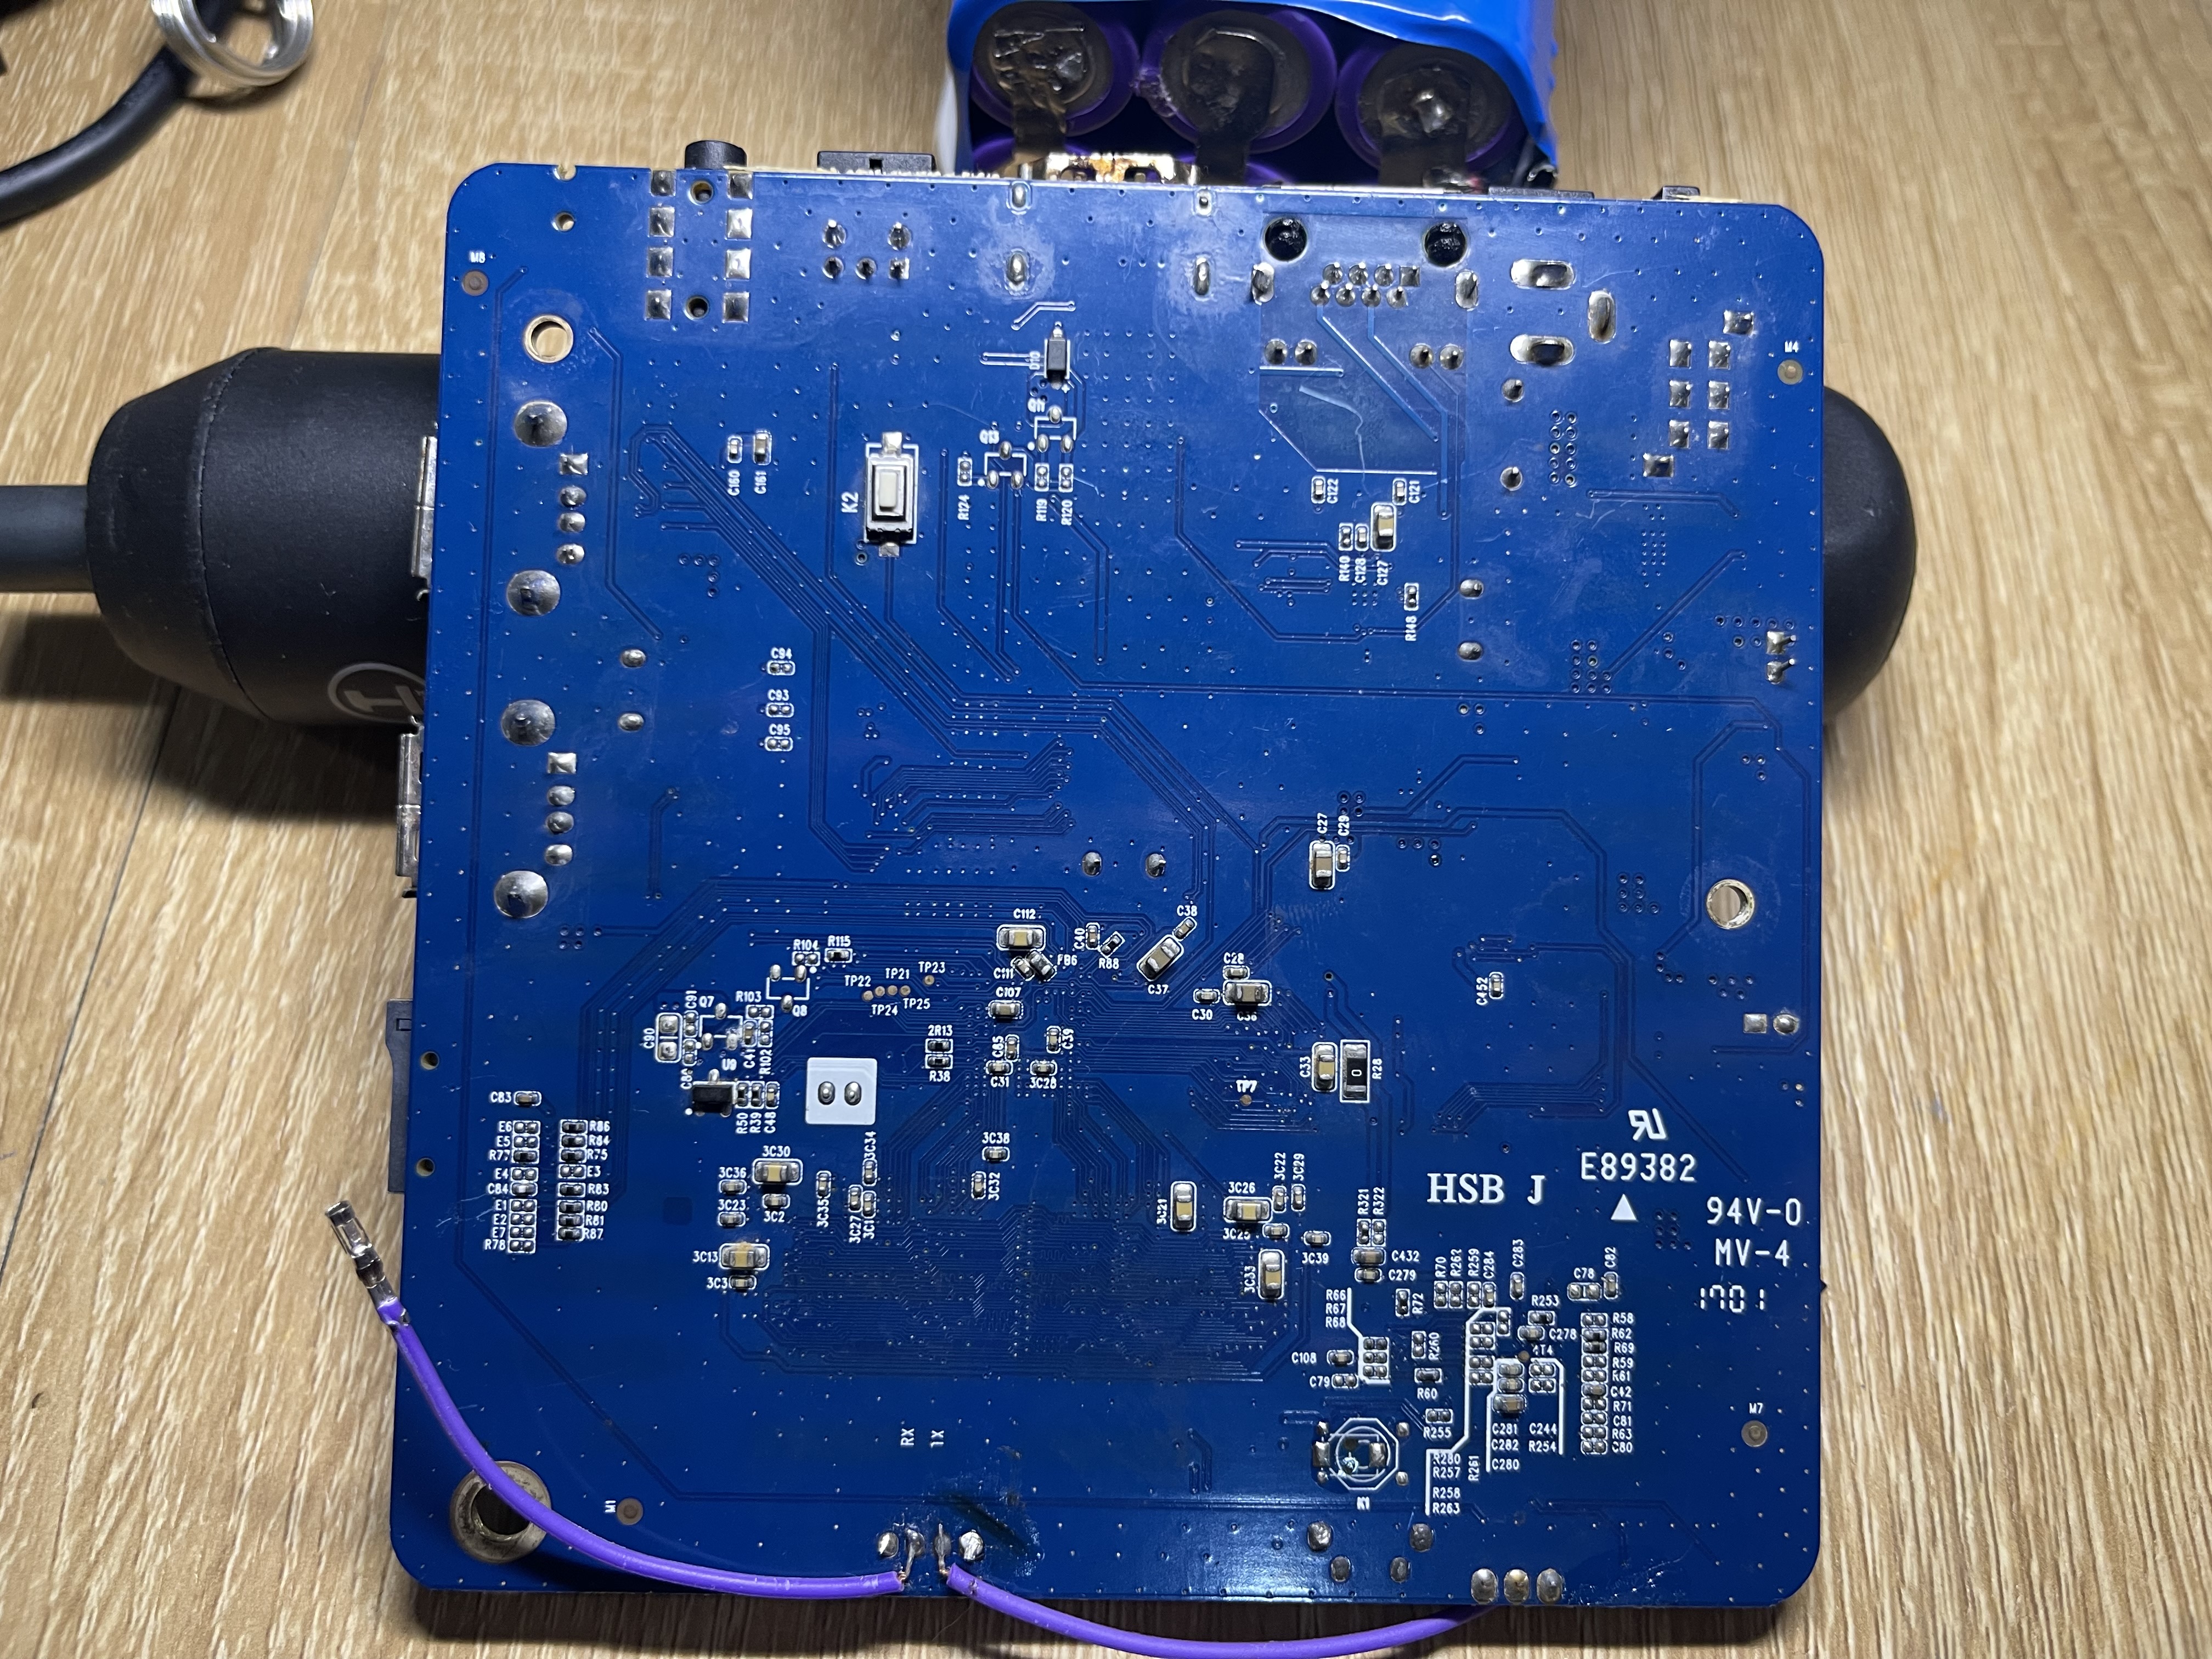
Before things got complicated, the first board behaved perfectly. I documented both sides of the PCB and marked the pins that are useful for anyone interested in eMMC wiring — D0, CLK, CMD, and the 3.3V rail. The backside also has a neat “1701” printing, suggesting the board was manufactured in week 01 of 2017. For a cheap IPTV device, the layout is surprisingly clean and serviceable.

For the initial test, I downloaded an image from
https://github.com/hzyitc/armbian-onecloud.
For loading Armbian manually, I stopped at the U-Boot prompt and used the following command set.
|
|
It booted immediately on the first try, but with major limitations: no WiFi, no GPU acceleration, and even the internal eMMC wasn’t detected. It only ran properly from the SD card, so that wasn’t good enough.
I switched to an older build instead:
Armbian_5.99_Aml-s805_Debian_buster_default_3.10.108_minimal.img, which uses the original Amlogic 3.x kernel. This one worked far better. The system booted cleanly, and after adjusting a few DTB settings, WiFi came up as well. Everything felt simple and straightforward — at that point I thought the work was easy and should be done soon.
The Unexpected Wall
The strange board
After the smooth progress on the first unit, I moved on to the second Smartbox 2 — this one had a manufacturing code 1832 (week 32 of 2018). Same board revision, same SoC, same memory chips, same layout. I assumed it would behave identically.
I was wrong.
I flashed the exact same Armbian images, used the same SD card, same UART setup, and the same U-Boot commands.
No matter how many times I tried, it refused to boot anything other than its stock Android.
The system always stopped right after U-Boot printed: Starting kernel
And then: nothing.
No HDMI output, no kernel logs, not even UART noise. Changing kernel log level, adding earlyprintk, modifying console settings, or forcing init to a busybox shell made no difference.
Boot log
Click to expand boot log
|
|
This behavior matched exactly what another person reported online:
https://forum.armbian.com/topic/33667-amlogic-s805-image/
The symptoms are identical:
U-Boot runs normally, then the kernel simply never starts.
At this point, I suspected something deeper than a bad SD card or wrong DTB.
Everything pointed to U-Boot itself.
Attempts to Fix It (All Failed)
Loading U-Boot via USB Burning Protocol (update tool)
For this test I used the open-source Amlogic USB burning utility from:
https://github.com/Stane1983/aml-linux-usb-burn
The tool provides a userspace binary named update, which communicates with the SoC’s USB Download Mode and can upload binaries directly into RAM and execute them.
This is the same protocol used by the official Amlogic Windows “USB Burning Tool”, but exposed in a CLI form.
Because the VNPT Smartbox 2 uses an Amlogic M8/M8B (S805) chip, I followed the procedure documented in Amlogic Update USB Tool User Guide — Section 4.1.2:
|
|
This sequence should:
- Initialize DRAM
- Load a compressed U-Boot (TPL/SPL) blob
- Decompress it into RAM
- Execute the newly uploaded U-Boot entirely from USB
I repeated this procedure with multiple U-Boot images taken from various S805 boards:
- MXQ S805
- M201/M201D
- Tronsmart S85
- ENY M8B
- Several community-built S805 U-Boots
Every attempt behaved the same: right after update run 0x10000000, the target board instantly rebooted. There was never any UART output from the uploaded U-Boot, and the reboot happened so fast that even the ROM banner did not change.
Burning U-Boot into SD Card for External Boot
I also tried forcing the board to boot an external U-Boot from a microSD card. First, I used AML Boot Card Maker to generate a proper Amlogic boot SD with u-boot.bin written to the first sectors. Then I repeated the process manually using dd, writing both community S805 U-Boot binaries and the bootloader dump from my working 1701 board.
No matter how the SD card was prepared, the 1832 board completely ignored it — no UART output, no fallback, no SD boot attempts at all.
Full eMMC Transplant and Bootloader Replacement
Since USB and SD card boot were both blocked, the next step was the most invasive one: desoldering the eMMC from the 1832 board to rewrite the bootloader externally. I removed the eMMC chip, dumped its contents with an external reader, and compared it against the fully working 1701 board. Amlogic stores U-Boot in three locations: boot0, boot1, and the first few megabytes of the user area (the “bootloader” partition, usually the first ~4 MB). Because all three regions must match, I replaced boot0, boot1, and the user area with the known-good data from the working device.
With the cloned bootloader installed, the board failed instantly. UART printed only the BootROM diagnostic:
|
|
This line means:
- BOOT:0 → try internal eMMC
- INIT:0 → eMMC detected
- READ:0 → read OK
- CHECK:FFFFBF00 → signature/hash verification failed
- BOOT:1 / INIT:10 → SD card not present
- USB:3 → USB Burning mode available but not connected
I then tried a safer variant: keep the original boot0/boot1, only replace the user-area bootloader. This allowed U-Boot to start, but the moment I ran the kernel with bootm, U-Boot printed:
|
|
At first, I don’t really understand the reason but after a few researches, I know that AML CPU has secured boot feature and it’s definitely enabled in the newer batches of the box (1832).
Digging Deeper Into U-Boot and the Amlogic Boot Process
Before moving forward, it was necessary to understand exactly how Amlogic’s boot chain works, and why every attempt to replace U-Boot or load a custom kernel fails on the secure-boot board.
U-Boot Command Set
For reference, here is the full help output from the board’s U-Boot (collapsible so the article stays clean):
Click to expand U-Boot command list
|
|
Amlogic S805 Boot Flow (Simplified)
Amlogic uses a multi-stage secure boot chain. Even without going deep into encrypted blobs, the high-level process looks like this:
-
BootROM (in SoC)
- Reads boot0 (BL2) from eMMC
- Verifies its signature
- If valid → execute
- If invalid → fallback to SD, then USB Burning mode
-
BL2 (in boot0/boot1)
- Initializes DRAM
- Loads BL30/BL31/BL32 (ARM Trusted Firmware stack)
- Performs another signature check
-
BL33 (U-Boot)
- Runs the full U-Boot shell
- Exposes commands like
mmc,imgread,bootm, etc. - Loads the Android boot image via Amlogic’s
imgread, not via raw reads
-
imgread kernel …
- Decrypts & verifies the kernel header
- Extracts kernel, initramfs, DTB
- Copies them into fixed RAM addresses determined by Amlogic’s bootloader
-
bootm
- Final jump into kernel entry point
- If the kernel is modified, unsigned, or mismatched → boot stops silently
This pipeline is strict, and every stage is cryptographically tied to the next one.
Why Replacing U-Boot Does Not Work
On the secure-boot board, BL2 and BL31 enforce authentication of BL33 (U-Boot).
If U-Boot is modified, cloned from another board, or taken from any community S805 device, BootROM/BL2 rejects it immediately.
- Replacing boot0/boot1 → fails at BootROM check
- Replacing user-area U-Boot → the board is still using boot0/boot1 for booting
- Loading U-Boot via USB → rejected before execution
- Loading U-Boot via SD → ignored completely
Why Kernel Replacement Also Fails (Two Different Failure Modes)
There are two cases someone might try to load a custom kernel, and the failure reasons are different:
Case 1 — Replace kernel inside the Android boot partition
If we replace:
- the kernel zImage,
- the initrd, or
- the DTB
inside the normal Android boot image (in the user area), but keep boot0/boot1 untouched, then imgread kernel boot ${loadaddr} detects that the kernel is not the signed one.
The verification fails, the decryption failes, and U-Boot outputs:
|
|
Meaning:
- kernel signature mismatch
- kernel header authentication failed
- kernel is rejected BEFORE
bootmis called
This proves the Android boot image is encrypted + authenticated.
Case 2 — Load a kernel manually using fatload
Example:
|
|
In secure mode:
- U-Boot still performs a kernel validity check before executing
bootm - U-Boot compares the kernel image against internal metadata (anti-rollback counters, hash records, signed kernel header)
- A manual
fatloadkernel has no valid signature, so the check silently fails - U-Boot jumps into the kernel entry point anyway, but the secure monitor blocks execution
This is why the board is stuck at:
|
|
The ROM, BL2, or TEE simply refuses to let an unsigned kernel execute, even if loaded manually into RAM.
The Android Boot Image is also encrypted
On these secure units:
- the kernel
- the ramdisk
- the dtb
inside Android boot.img are not plain zImage + cpio like normal Amlogic builds.
They are encrypted by the vendor signing tool and validated by U-Boot/TEE.
This forms a complete, tamper-proof chain: BootROM → BL2 → BL31 → U-Boot → encrypted kernel → Android userspace. This is exactly what we observe on the 1832 secure-boot board.
Finding Out the Initramfs Exploit
At this stage I had already accepted that replacing U-Boot or injecting a new kernel was cryptographically impossible. So I shifted focus to understanding what happens after U-Boot loads the encrypted boot image, hoping to find a weakness in the later stages.
Failed Attempts at Decoding or Rebuilding the Encrypted Boot Image
Before discovering the real exploit path, I spent some more days trying to work around the encryption:
- Extracting and analyzing the boot partition with standard tools (
abootimg,mkbootimg,unmkbootimg) - Brute-inspecting the image structure to locate kernel headers
- Searching for LZO/LZ4 gzip signatures inside
boot.img - Trying to recover the AES/secure header by diffing multiple dumps
- Copying encrypted kernels between devices
- Attempting to decrypt via the running system’s
/dev/ubootenvor efuse maps - Searching through U-Boot for hardcoded decrypt routines
None of it worked. Actually there are someone who successfully bypassed the AML secured boot: https://fredericb.info/2016/10/amlogic-s905-soc-bypassing-not-so.html, but it’s too complicated for me and this limited time project.
A Crucial Observation: U-Boot Always Loads the Initramfs to a Fixed Address
Through multiple UART captures, I noticed a repeating pattern: the Android ramdisk always appeared at the same address in RAM.
Here is the relevant portion of a successful Android boot log:
Click to expand Android boot log
|
|
The important part: Ramdisk start addr = 0x125a8000, len = 0x20f1df
This means:
- U-Boot decrypts the ramdisk from the encrypted boot image
- It places the plaintext ramdisk at 0x125a8000 in RAM
- The kernel later copies it to another region (0x04009000), but only after U-Boot already puts a decrypted version in place
This was a breakthrough. Even though the boot image is encrypted on disk, the decrypted ramdisk exists in RAM in plaintext before the kernel uses it. If we can overwrite that region after U-Boot loads the encrypted Android ramdisk but before the kernel processes it, we control early boot.
First Exploit Test: Overwriting the Decrypted Initramfs in RAM
With this theory in mind, I tried something simple:
- Let U-Boot load the Android boot image normally
- Interrupt the process after decryption
- Manually overwrite the RAM area at 0x125a8000 with my own Linux initramfs
- Let the boot continue
The result?
It dropped me directly into the initramfs shell.
This confirmed everything:
- The bootloader enforces secure boot ONLY for the image stored on eMMC
- But once the ramdisk is decrypted into RAM, there is no further signature check
- If we overwrite that memory region before
bootmhands control to the kernel, we can inject our own early userspace
This is the fundamental vulnerability that makes the entire Debian-on-Secure-Boot-S805 project possible.
In other words:
We cannot decrypt or rebuild the encrypted Android boot image,
but we can hijack the decrypted initramfs in RAM before the kernel uses it.
This discovery became the foundation for the two-stage initramfs technique described later.
Using Linux ramfs to load Debian
Once the initramfs-overwrite trick in RAM was confirmed to work, the next challenge appeared immediately: the size limit.
When U-Boot loads the decrypted Android ramdisk into memory at 0x125a8000, it places it right next to the DTB and other boot structures. If I load a larger custom initramfs at that same address, it simply overwrites the device tree, and the kernel panics instantly.
The stock Android ramdisk is tiny — about 2.1 MB.
My Debian/Armbian initramfs was 4.2 MB, almost double. Stripping it is quite challenging. Fortunately, this board has mmc/sdcard driver integrated inside the kernel, so I decided to strip udevadm and kmod from the ramfs. If the disk driver is not integrated inside the kernel, we have another way to strip the ramfs:
- Create a small ramfs with minimal binary (that has switch_root)
- Use Uboot fatload to load the full ramfs (raw, not gz) into a specific RAM address (Eg:
0x13000000) with specific size (Eg:0x00800000) - Mount a temporary file system and dd the above address to tmpfs
- Switch root to the new root
After stripping binary, here is the sample init.
Click to expand Example code
|
|
Then, we can boot the board using our new uinitrd_tiny
|
|
Building rootfs for Debian
Change init system from systemd to sysvinit
I took a prebuilt rootfs that is known to works on S805 box. It’s a Debian 10 (Armbian 5.99), which is quite outdated, but for demonstration, it’s still good. Although we changed the ramfs to load Debian, the kernel is still Android. Android uses different init system that is not compatible with systemd. Therefore, we will remove the systemd and install the older one: sysvinit. We will use qemu-user-static to mount rootfs of Armbian/Debian image to the current Ubuntu system to install:
|
|
Now we are in the root of the Armbian/Debian. It’s time to get rid of systemd and go back to sysvinit:
|
|
To unmount correctly:
|
|
The Android user group
Android also uses Linux UIDs/GIDs, but its permission model is very different from a classic GNU/Linux system.
Instead of relying purely on Linux capabilities (CAP_NET_*, CAP_SYS_*, …), Android defines a fixed list of Android IDs (AIDs) that represent system roles and kernel-visible capabilities.
The canonical list is defined in AOSP here:
Of particular interest are the 3000-series groups. As documented in the source, these groups are supplemental groups only and are explicitly checked by the Android kernel to grant access to sensitive subsystems such as networking. For example:
inet (3003)– permission to create IPv4/IPv6 socketsnet_raw (3004)– permission for raw sockets (e.g.ping)net_admin (3005)– permission to configure network interfaces and routing
Why we must recreate these groups in Debian
The VNPT Smartbox 2 still boots with the vendor Android kernel (3.10.33).
When Android userspace is replaced by Debian, the Android AID groups no longer exist in /etc/group. As a result, even root may lack the supplemental groups that the kernel expects, and basic operations such as DNS resolution or opening network sockets can fail.
To fix this, we must:
- Recreate the required Android groups with the same GID numbers
- Add our Debian users (including
rootor service users) to those groups
Once this is done, networking and other kernel-gated features start working normally.
Creating the Android groups and adding users
Below is the group set I use for normal operation (networking, optional Bluetooth, optional Android-style storage).
This creates the groups and adds the chosen user to them.
|
|
In practice, inet is the most important group. The others should be added only when the corresponding functionality (raw sockets, interface management, Bluetooth, or Android /sdcard access) is actually needed.
Fix other things
Fix apt-get
On many Android kernels (especially older 3.10 vendor trees like Amlogic S805), the networking path used by glibc resolver is partially incompatible with unprivileged processes, so we run apt as root.
|
|
Fix time
This box doesn’t have RTC module so it has to get time from Internet. Therefore, we use ntpdate to automatically sync time from the Internet.
Install and configure ntpdate
|
|
Fix locale
|
|
Hold sysvinit and prevent accidently installed systemd
|
|
Getting drivers to work
On Android TV boxes, drivers are the hardest part when replacing Android with a normal Linux distribution.
Most peripherals rely on vendor-specific, out-of-tree kernel modules that are tightly coupled to the Android kernel and device tree.
For the VNPT Smartbox 2 (Amlogic S805), the most important drivers are:
- Wi-Fi (RTL8189ES, SDIO)
- Mali GPU (for graphics acceleration, optional)
- HDMI / display (already handled by the vendor kernel)
Wifi (RTL8189ES)
For Wi-Fi to work, we normally need:
- a kernel module (
*.ko) - a firmware blob (
*.bin) loaded by the driver at runtime
The first step is to inspect the working Android system and reuse exactly what it uses.
To find the kernel module and firmware on Android, use:
|
|
In my case, the result was: /system/lib/8189es.ko. No external firmware files were found, and Android boot logs showed no request_firmware() messages. This means the firmware is embedded inside the kernel module, which is very common for older Realtek drivers on Android 3.10 kernels.
Since the Wi-Fi firmware is embedded inside the driver, we only need to copy the 8189es.ko to Debian. We will place all the third-party modules under /lib/modules/<kernel-version>/extra. Then, we install it.
|
|
At this point, ip link should show at least 1 wlan interface. We will bring it up and set it to be automatically enabled on boot
|
|
Now, we can connect to wifi using wpa_supplicant.
|
|
HDMI & Mali driver
Due to the nature of the Android kernel, making it works is difficult so I leave it not working until I have more time
Install Debian rootfs into eMMC
Understanding the partition table and U-boot command
Before touching the eMMC, it is important to clearly understand what layout we are dealing with.
On VNPT Smartbox 2 (Amlogic S805), the eMMC uses Amlogic proprietary Android partitioning, not a standard GPT/MBR layout.
Below is the original partition table detected by U-Boot / SPL:
|
|
On Amlogic devices (Meson8b / S805), the eMMC layout is defined in two places, but only one is authoritative. This is why repartitioning with tools like ampart – https://github.com/7Ji/ampart often behaves unexpectedly on secure-boot devices.
1. Bootloader DTB (master)
- The real partition table lives in the U-Boot DTB.
- U-Boot generates the EPT from this DTB at boot.
- On secure-boot boards, this DTB is encrypted and signed, so
ampartcannot modify it.
2. reserved partition (EPT copy)
- Contains a writable copy of the EPT used by Android tooling and
ampart. - This copy exists for update and maintenance purposes only.
- It is not authoritative.
At every cold boot, U-Boot:
- Loads the bootloader DTB
- Rebuilds the EPT from the DTB
/partitionsnode - Overwrites the EPT stored in the
reservedpartition
Since the U-boot is encrypted in the secure boards, ampart can successfully modify the reserved partition. On the next reboot, U-Boot restores the original layout from the encrypted DTB. Therefore, repartitioning is impossible without bypassing secure boot.
Reuse existing partitions
Instead of modifying the partition table (which is unreliable on secure-boot devices), the existing eMMC partitions can be reused and repurposed as follows:
/dev/data: This is the largest partition on the eMMC so it will be used as the Linux root filesystem (/)./dev/system: Basically, it won’t be used in Debian so it can be kept for Android as a fallback, or reformatted and used as a secondary Linux partition (e.g./usr,/opt, or/var)./dev/boot: Kept unchanged, as it contains the signed Android kernel required for booting./dev/env: A raw partition used by U-Boot to store environment variables. The actual U-Boot environment size is only 64 KB, so the remaining space is reused to store a small ramfs / initramfs./dev/cache: Used to store TWRP. Due to secure boot, TWRP can only run as an application and cannot be installed into therecoverypartition. By placing it incache, TWRP can be launched anytime without requiring external storage.
This approach avoids repartitioning while still providing a flexible and practical Linux setup on a secure Amlogic device.
DD to eMMC
- For the rootfs
|
|
- For ramfs file
|
|
- Fix U-boot to load the Debian from eMMC
|
|
- Remove U-boot auto reset
env
|
|
- Fix
fstab
|
|
Conclusion
Due to the limitations imposed by secure boot on some VNPT MyTV Smartbox 2 (S805) boards, it is not possible to fully replace the original Android boot chain. The practical approach is to reuse the stock Android kernel together with a custom initramfs to start a Debian userspace. As a result, we get Armbian (Debian 11) running with sysvinit on top of the Android kernel.
Despite this constraint, the system is a fully functional Armbian environment and behaves like a normal Debian-based server for most real-world use cases. Stability is good, performance is acceptable for its class of hardware, and all essential kernel features required for server workloads are available.
In practice, this setup is perfectly usable as a small home server. Software and services that run well include:
- LEMP stack (Nginx, MariaDB/MySQL, PHP)
- Node.js 18 (APIs, bots, small web services)
- OpenVPN and WireGuard-Go
- Pi-hole (network-wide DNS filtering and ad blocking)
- FTP / SFTP server
- Transmission (torrent box)
- SSH for remote administration
- File server / NAS-like usage over LAN
- Lightweight Docker containers (with reasonable expectations)
- Various cron-based automation and monitoring tools
With this approach, the VNPT MyTV Smartbox 2 is no longer just an Android TV box but a compact, low-power Linux machine that can reliably handle many everyday server tasks at home.